Zimbra是著名的开源系统,它一体化地提供了邮件收发、文件共享、协同办公、即时聊天等一系列解决方案,是开源软件中的精品。它拥有美观大气的使用界面,以及非常实用的功能。作为邮件服务器系统,Zimbra更是凭借卓越的稳定性和功能当之无愧地成为开源邮件服务器系统的首选,适合各类型/人数的用户群,尤其适合团队使用。之前我们写过一个简单的Zimbra邮件服务器安装的教程,然而那篇文章写于五年前,对于现在的版本已经不再适用。正好由于前天,Online.net服务器大幅提价,我们不得不迁移之前的服务器,于是需要在新的系统上重新搭建一次Zimbra. 因此,我们这里凭借这个机会再介绍一下如何安装与配置独立的Zimbra开源办公与邮件服务系统,希望对大家有所帮助。多台服务器协同部署的步骤这里不做太多介绍。
本文作者为香菇肥牛,原文链接为https://qing.su/article/zimbra.html, 转载需经过作者许可且注明原文链接。
1, 系统软硬件要求
Zimbra的体量较大,因此对于系统环境的要求较高。首先,系统必须为64位。目前,Zimbra支持的操作系统包括:CentOS 6, CentOS 7, Ubuntu 14.04 LTS, Ubuntu 16.04 LTS, Red Hat Linux 6/7, 以及Oracle Linux 6/7.
关于硬件需求,首先,内存需要8 GB或者以上,建议16 GB. 系统的硬盘占用约为8 GB左右,视自己的需要而定。CPU和其他硬件没有特别需求,但是Zimbra官方说明中有提到,强烈不建议在RAID 5 (包括50)的服务器上搭建Zimbra. 如果您有类似的服务器,建议更改RAID模式,避免RAID 5或者50.
鉴于Zimbra的体量,我们不建议在VPS上安装Zimbra, 而最好是在一台独立服务器上安装。本文的操作环境为Ubuntu 16.04 LTS 64bit.
2, 配置DNS
我们简要说明一下一个最简单的zimbra邮件服务器的DNS配置需求。
如果以qing.su域名为例,我们将域名本身qing.su以A记录解析到任意IP, 然后将邮件服务器的hostname, 比如mx.qing.su以A记录解析到我们将要搭建的邮件服务器的IP上。
然后,我们分别将qing.su与mx.qing.su以MX记录解析到mx.qing.su, 优先级可以为任意值。
如果需要用web访问邮箱,可以将mail.qing.su解析到邮件服务器的IP上。
其他记录的设置,比如TXT, SRV等,可以后期根据自己的需要来自行配制。
3, 系统环境的设置
毫无疑问,对于任何邮件服务器来说,最重要的前提步骤是正确设置服务器的hostname. 如何正确设置服务器的hostname我们已经强调过多次。我们以mx.example.com为例,当在SSH中执行hostname命令时,应当看到的回显为短主机名,即mx; 而在SSH中执行hostname -f命令时,应当看到的回显为长主机名(FQDN), 即mx.example.com. 若hostname没有正确设置好,请不要继续。
然后,我们用root账户登录SSH, 即可开始安装。(不要sudo, 请直接su到root, 否则会出错)
4, 下载并安装软件包
Zimbra各系统软件包的下载地址如下:https://www.zimbra.com/downloads/zimbra-collaboration-open-source/
请按照自己的需求下载。我们这里以Ubuntu 16.04为例。执行:
1 2 3 4 5 6 7 | apt-get update && apt-get upgrade cd /tmp wget https://files.zimbra.com/downloads/8.8.9_GA/zcs-8.8.9_GA_2055.UBUNTU16_64.20180703080917.tgz tar xvzf *.tgz rm -f zcs*.tgz cd zcs* ./install.sh |
5, 选择安装组件
正确执行上述步骤后,首先会提示是否同意用户协议,选择Y即可。
1 | Do you agree with the terms of the https://qing.su software license agreement? [N] Y |
然后会提示选择需要安装的组件,如果您不是特别了解的话可以直接选择默认选项。
1 2 3 4 5 6 7 8 9 10 11 12 13 14 15 | Use Zimbra's package repository [Y] Install zimbra-ldap [Y] Install zimbra-logger [Y] Install zimbra-mta [Y] Install zimbra-dnscache [Y] Install zimbra-snmp [Y] Install zimbra-store [Y] Install zimbra-apache [Y] Install https://qing.su[Y] Install zimbra-spell [Y] Install zimbra-memcached [Y] Install zimbra-proxy [Y] Install zimbra-drive [Y] Install zimbra-imapd (BETA - for evaluation only) [N] Install zimbra-chat [Y] |
最后,系统会提示是否确认更改,我们需要选择Y.
1 | The system will be modified. Continue? [N] Y |
至此,系统将会下载必要的安装包并自动安装。
6, 配置Zimbra
安装完毕后,系统会弹出命令行菜单,如下面这样:
1 2 3 4 5 6 7 8 9 10 11 12 13 14 15 16 17 18 19 20 21 22 23 24 25 26 27 28 29 30 31 32 33 34 35 36 37 38 | Main menu 1) Common Configuration: 2) zimbra-ldap: Enabled 3) zimbra-logger: Enabled 4) zimbra-mta: Enabled 5) zimbra-dnscache: Enabled 6) zimbra-snmp: Enabled 7) zimbra-store: Enabled +Create Admin User: yes +Admin user to create: admin@mx.example.com ******* +Admin Password UNSET +Anti-virus quarantine user: virus-quarantine.6zk4_0qy@mx.example.com +Enable automated spam training: yes +Spam training user: spam.zc3z28w0@mx.example.com +Non-spam(Ham) training user: ham.bkojeqoiq@mx.example.com +SMTP host: mx.example.com +Web server HTTP port: 8080 +Web server HTTPS port: 8443 +Web server mode: https +IMAP server port: 7143 +IMAP server SSL port: 7993 +POP server port: 7110 +POP server SSL port: 7995 +Use spell check server: yes +Spell server URL: http://mx.example.com:7780/aspell.php +Enable version update checks: TRUE +Enable version update notifications: TRUE +Version update notification email: admin@mx.example.com +Version update source email: admin@mx.example.com +Install mailstore (service webapp): yes +Install UI (zimbra,zimbraAdmin webapps): yes 8) zimbra-spell: Enabled 9) zimbra-proxy: Enabled 10) Default Class of Service Configuration: s) Save config to file x) Expand menu q) Quit Address unconfigured (**) items (? - help) 7 |
这里我们选择7, 进入Store configuration, 并在下一步选择4, 设置管理员密码。
1 2 3 4 5 6 7 8 9 10 11 12 13 14 15 16 17 18 19 20 21 22 23 24 25 26 | Store configuration 1) Status: Enabled 2) Create Admin User: yes 3) Admin user to create: admin@mx.example.com ** 4) Admin Password UNSET 5) Anti-virus quarantine user: virus-quarantine.6zk4_0qy@mx.example.com 6) Enable automated spam training: yes 7) Spam training user: spam.zc3z28w0@mx.example.com 8) Non-spam(Ham) training user: ham.bkojeqoiq@mx.example.com 9) SMTP host: mx.example.com 10) Web server HTTP port: 8080 11) Web server HTTPS port: 8443 12) Web server mode: https 13) IMAP server port: 7143 14) IMAP server SSL port: 7993 15) POP server port: 7110 16) POP server SSL port: 7995 17) Use spell check server: yes 18) Spell server URL: http://mx.example.com:7780/aspell.php 19) Enable version update checks: TRUE 20) Enable version update notifications: TRUE 21) Version update notification email: admin@mx.example.com 22) Version update source email: admin@mx.example.com 23) Install mailstore (service webapp): yes 24) Install UI (zimbra,zimbraAdmin webapps): yes Select, or 'r' for previous menu [r] |
如果有其他选项您希望更改的,也可以一并更改(但是不建议更改端口地址)。更改完毕后,输入r返回上级菜单,然后输入a让更改生效并将配置写入至文件。
1 2 3 4 5 6 | *** CONFIGURATION COMPLETE - press 'a' to apply Select from menu, or press 'a' to apply config (? - help) a Save configuration data to a file? [Yes] Save config in file: [/opt/zimbra/config.11819] Saving config in /opt/zimbra/config.11819...done. The system will be modified - continue? [No] Yes |
要忘记最后要输入Yes来保存更改。几秒钟之后,系统就配置完毕。至此,Zimbra安装完毕,我们可以登录后台添加域名、添加用户等进行一系列的管理了。
7, 配置SSL
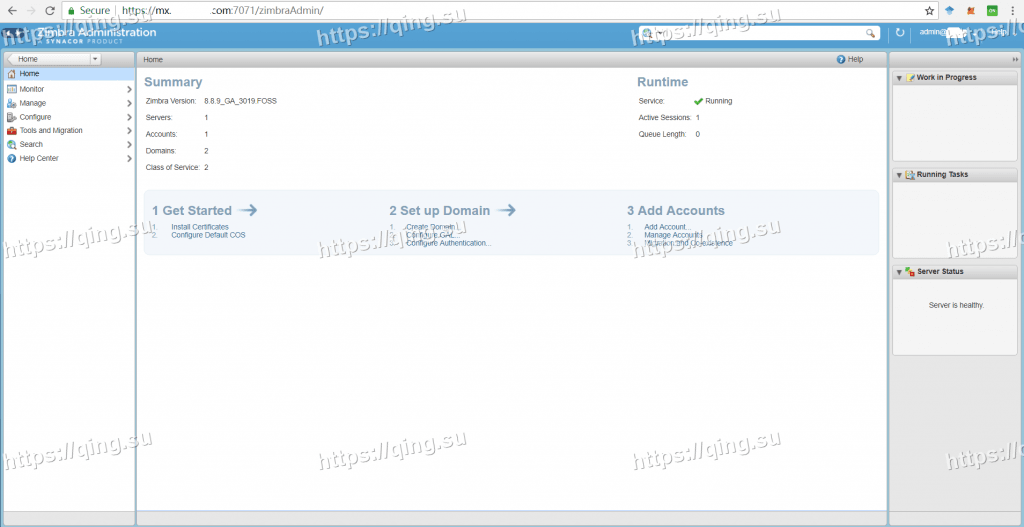
安装完毕Zimbra以后,我们就可以通过https://mx.example.com:7071登录后台,进行管理。此时,SSL证书还没有配置好,我们需要配置SSL, 否则浏览器会一直报错。点击界面下方Get Started –> Install Certificates, 选择Next然后选择Generate the CSR for the commercial certificate authorizer, 然后在弹出来的界面中生成CSR. 我们需要将主域名mx.example.com填在Common Name中,然后在Subjective Alternative Name中添加需要一并生成证书的其他域名,比如example.com, www.example.com, mail.example.com等。点击Next即可生成证书CSR.
有了CSR之后,我们即可申请证书了。Zimbra配置证书的过程比较tricky, 经常会报错,特别是如果在网页后台安装证书时报错的原因很不清晰,导致无法分析错误发生的原因。因此,我们一般选择在SSH中使用命令行的方式安装证书。下面我们以Let’s Encrypt为例安装证书,其他的商业证书的安装较为简单,这里就不再重复。
我们用SSH登录服务器,然后su切换至root. 首先,我们将刚才的CSR保存至/tmp/mx.example.com.csr文件。然后,安装certbot, 签发Let’s Encrypt证书。
1 2 3 4 | apt-get install software-properties-common add-apt-repository ppa:certbot/certbot apt-get update apt-get install certbot |
这里有一个小技巧,通常我们签发Let’s Encrypt证书的时候是让它自己生成私钥和CSR的,但是在需要的时候,certbot可以根据已有的CSR来签发证书,只需使用–csr参数即可。因此,我们基于刚刚生成的CSR来签发证书。
1 | certbot certonly --standalone --csr /tmp/mx.example.com.csr |
签发的证书和链文件位于/tmp目录内。需要注意的是,Certbot生成的中间链会在Zimbra中校验失败,我们需要下载额外的Root CA和中间链证书。
1 2 | wget https://letsencrypt.org/certs/isrgrootx1.pem.txt -O ca.crt wget https://letsencrypt.org/certs/letsencryptauthorityx3.pem.txt -O ca_intermediary.crt |
然后再整理、合并一下证书:
1 2 | mv 0000_cert.pem commercial.crt cat /tmp/ca_intermediary.crt /tmp/ca.crt > /tmp/ca_chain.crt |
现在就可以开始签发安装证书了。安装证书需要使用zimbra用户,这是在安装Zimbra的时候新建的内置用户。
1 | su zimbra |
安装之前,我们先验证一下证书。执行
1 | /opt/zimbra/bin/zmcertmgr verifycrt comm /opt/zimbra/ssl/zimbra/commercial/commercial.key /tmp/commercial.crt /tmp/ca_chain.crt |
如果看到类似于下面的回显,说明合格了。如果报错,大概率是因为Root CA和中间链哪里没有弄对,请仔细检查后再试。
1 2 3 4 5 | ** Verifying '/tmp/commercial.crt' against '/opt/zimbra/ssl/zimbra/commercial/commercial.key' **Tutorial written by https://qing.su** Certificate '/tmp/commercial.crt' and private key '/opt/zimbra/ssl/zimbra/commercial/commercial.key' match. ** Verifying '/tmp/commercial.crt' against '/tmp/ca_chain.crt' Valid certificate chain: /tmp/commercial.crt: OK |
证书验证完毕后,执行下面的命令安装并检验:
1 2 | /opt/zimbra/bin/zmcertmgr deploycrt comm /tmp/commercial.crt /tmp/ca_chain.crt /opt/zimbra/bin/zmcertmgr viewdeployedcrt |
最后,我们要重启zimbra服务器,让证书生效。
1 2 | exit service zimbra restart |
再次登录https://mx.example.com:7071, 已经可以看到证书生效了。
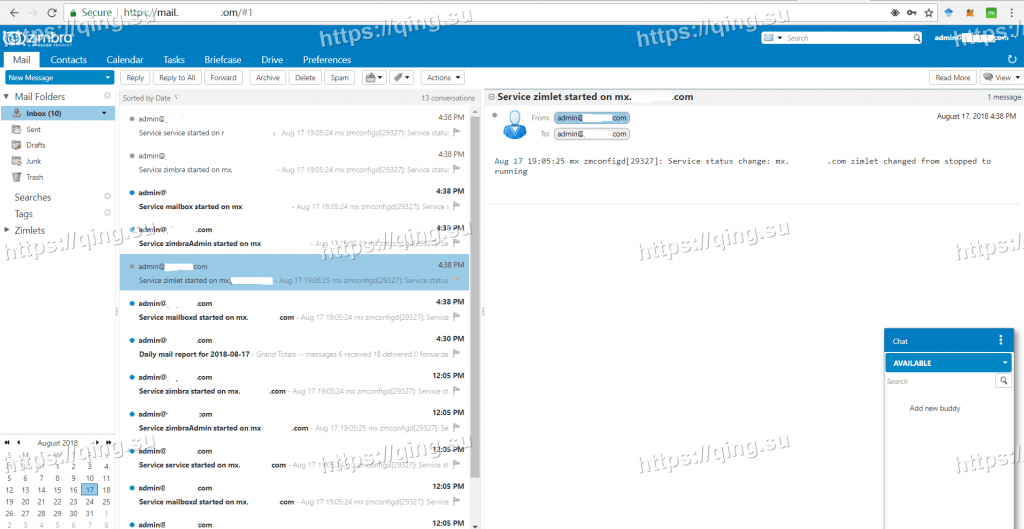
至此,Zimbra服务器安装完毕并成功配置了SSL证书。在添加好相应的域名之后,即可使用相关用户名和密码登录https://mail.example.com来登录邮箱,界面非常美观大气。可以看到,在邮箱右下角还有聊天窗口,可以和同一个工作组内的伙伴实时通讯并传输文件。
本次Zimbra协作与邮件服务系统的搭建和配置就介绍到这里,希望对大家有所帮助。如果朋友们在安装和使用的过程中遇到什么问题,欢迎留言咨询,我将尽力解答。本文为香菇肥牛原创,原文链接为https://qing.su/article/zimbra.html, 转载需经过作者许可且注明原文链接。谢谢大家。


支持一下大佬的新教程。我可以转载吗?会标明原文作者和链接。
请问能实现普通用户自行注册使用的功能吗
可以实现,但要自己编写,没有现成的。
有没有中文或汉化呢?
Zimbra应该有中文的
这个需要下载的license文件, 不知道这个license是trial有时间限制呢,还是怎么回事?
开源版不需要License的,商业版才需要
开源版一样要, 你去看看就知道了.https://www.zimbra.com/downloads/zimbra-collaboration/ 说是需要license key文件的.
你看的这个不是开源版的,是商业版。
开源版是这个:
https://www.zimbra.com/downloads/zimbra-collaboration-open-source/
是的,我发现了.
默认的后台管理登陆入口url是什么? 好像不是admin
文章里写了
https://mx.example.com:7071
这个对资源要求挺高的, 估计是大型邮件项目才用到.
另外安装时候没有选择是apache/nginx的选项, 可能是开源版的原因.
大佬牛逼!我已安装成功!
RAID6和RAID60也不是省油的灯,哈哈哈哈哈。
非常感谢!安装成功了。我签发的证书是在root下。其他的都很顺利
为啥不推荐 raid5和raid50 呢?
那 raid6 或者 raid1+0 可以么?
经常测试,好像很容易就被判断垃圾邮件了,没有去作认证